把ESXi中的虚拟机通过OVA/OVF导出的方式迁移到Proxmox 5
一、导出OVA/OVF
首先第一步是从ESXi的管理客户端vSphere Client中把要迁移的虚拟机关机,然后选中它,在菜单“文件”-“导出”-“导出OVF模板”,然后格式选择“文件的文件夹(OVF)”(或者是“单个文件(OVA)”),等待导出完成。注:名称最是没有中文和一些特殊符号,符号可以使用“-”。
这个方法好像会把虚拟机硬盘未使用部分压缩起来,会比原来的vmdk文件小很多,如果你虚拟机的硬盘不是使用满了的话。
二、上传到目标主机
然后就是把VPS-180324022个文件上传到proxmox到主机。可以用winscp、xftp。
也可以用web端,用web端的时候。在web左侧选择“文件夹视图”,然后展开“存储”,选中一个可以上传镜像的存储,比如“local(33ol)”,其中33ol是你的主机名字,在右边选择“内容”-“上传”即可。因为上传的只能是iso或者容器模板,这里选择iso,然后把之前的文件夹做成iso后就可以上传成功了。
我是使用xftp上传到/var/lib/vz/template/iso里的。其实上传到根目录也可以。
三、解压
上传iso的主机,找到上传的文件后可以使用ssh客户端或直接在web上里的控制台登录操作。
如果上传的是VPS-180324022.ova,那可以复制或者重命名在.ova后面加上.iso。
复制:cp VPS-180324022.ova VPS-180324022.ova.iso
重命名:mv VPS-180324022.ova VPS-180324022.ova.iso
然后则是解压:tar xvf VPS-180324022.ova.iso
解压成功之后会得到以下文件:
1.一个ovf文件,这个文件包含了虚拟机的硬件配置,例如cpu规格、内存等。
2.一个或多个vmdk文件,这些是虚拟机的硬盘镜像,数量取决于虚拟机有多少个硬盘。
注:如果是使用wscp或者xftp把整个文件夹上传的就无须解压,可以直接导入。
四、导入
先加入cd VPS-180324022目录里,然后输入目录导入cd /var/lib/vz/template/iso/VPS-180324022
导入创建vps:qm importovf 180 VPS-180324022.ovf local-lvm --format raw
不行的话先创建个虚拟机然后在用命令导入硬盘:qm importdisk 180 VPS-180324022.vmdk local-lvm --format raw
其中:
180 是虚拟机的id,在Proxmox所有虚拟机中要唯一,是一个3位数字。
VPS-180324022.ovf 是tar解压出来的ovf文件。
local-lvm 是目标存储位置。默认安装Proxmox的local只有100G、不建议放在local在里面。
–format raw 是指定导入后硬盘镜像的格式,默认是raw格式。如果是使用raw格式、默认可以不添加。
五、后记
1.导入成功后发现网卡没有成功导入,可以在保持导入的虚拟机关机的情况下手动添加相应的网卡。
如果需要保持mac地址不变的话,可以先在vsphere client中把相应的网卡mac复制出来,添加的时候再用复制出来的mac填进去即可。
2.选项里的OS类型需要修改成对应版本
3.但是开机还是会蓝屏,这是硬盘驱动的问题。
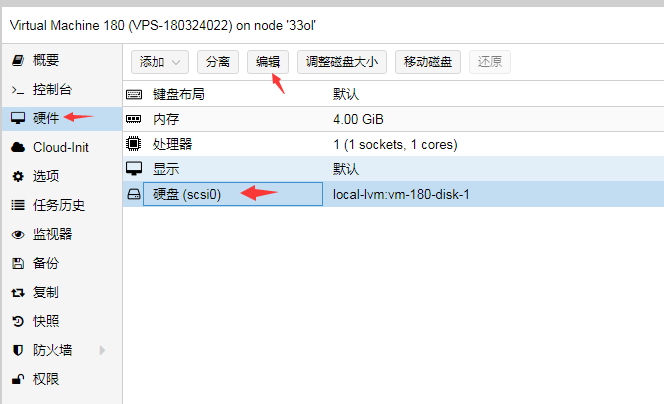
去硬件里先把硬盘分离,然后硬盘编辑,IDE添加。然后开机就正常了。